#HomebreweryRebuild

After a cross-country move, family emergencies, and starting to get things organized, I’m finally returning my attention homebrewing. OK, my attention has been focused on homebrewing in general, but I can actually see making time to actually brew some beer in the near future.

First, though, I need to fix some problems, reassemble some gear, and re-stock some supplies.

Fixing Problems

I have a few things that need to be fixed. Not many things are broken, but my brewery is definitely not set up to work properly at the moment.

Physical Fix

My chiller burst. During a frigid Wisconsin winter, I didn’t properly drain my immersion chiller, so it burst. The video above is my misadventure(s) getting it fixed. From expanded copper tubing to changing fittings, I eventually got it fixed.

Logical Fix

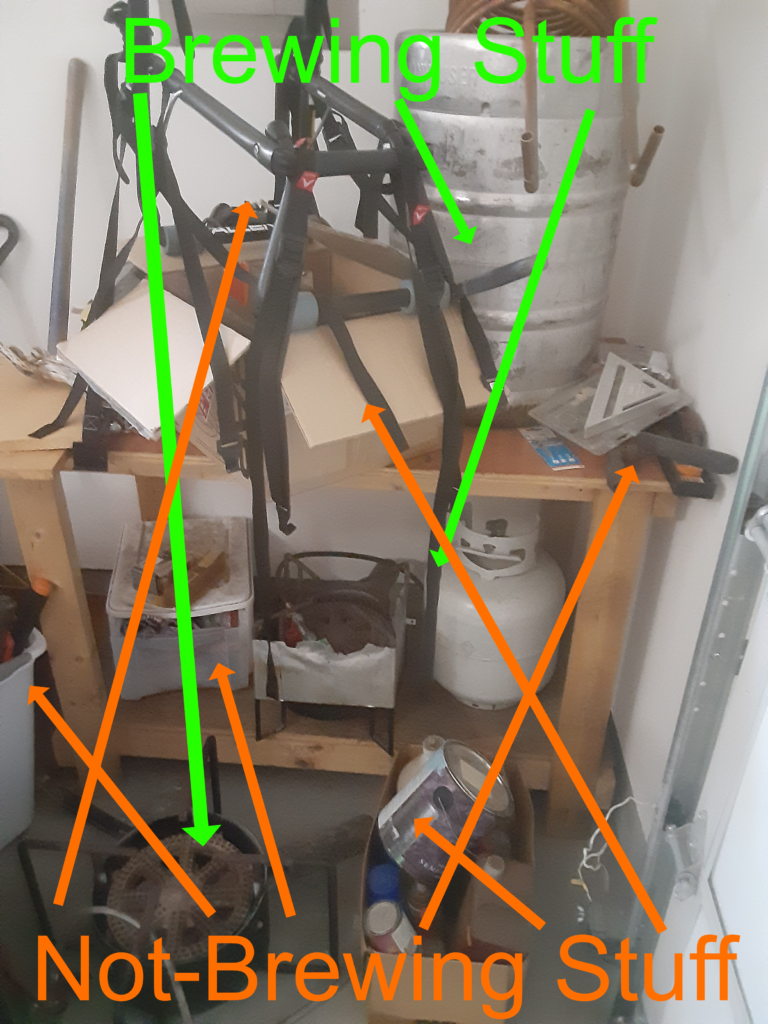
The layout of my equipment needs to get fixed. When I was unpacking the stuff for our garage, I tried to group my brewing stuff together. But I didn’t know how much space we were going to have. I wound up putting some stuff over here, over there and the rest of it in the opposite corner. And quite a bit of it got mixed with non-brewing items.

Garage clutter

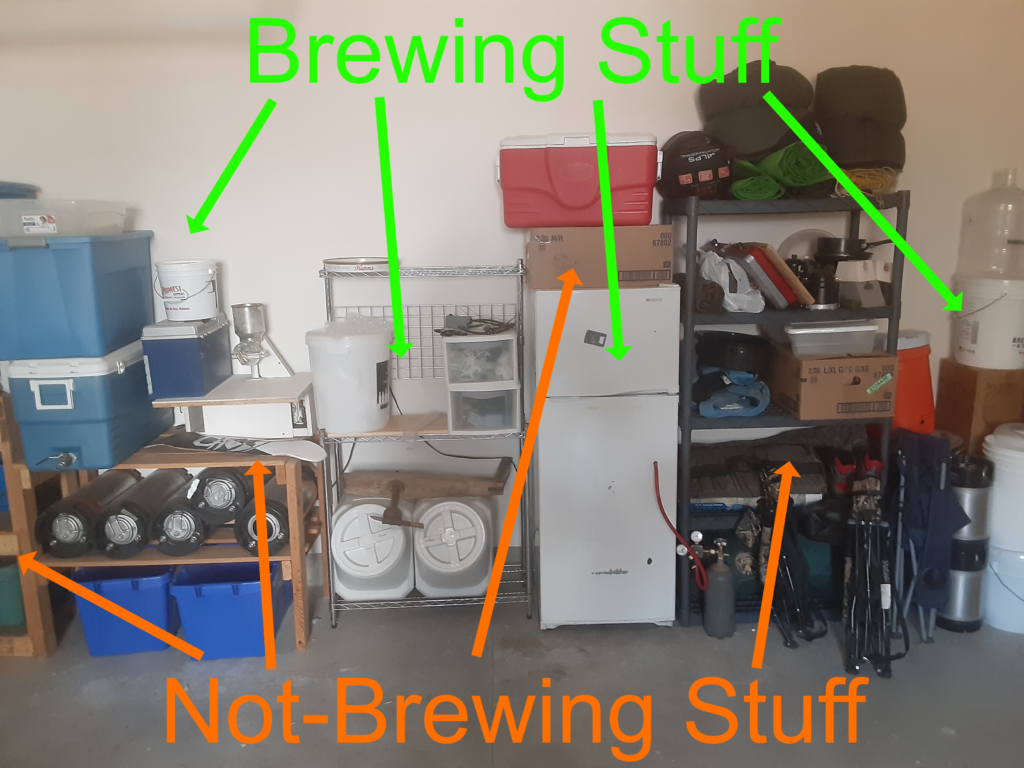
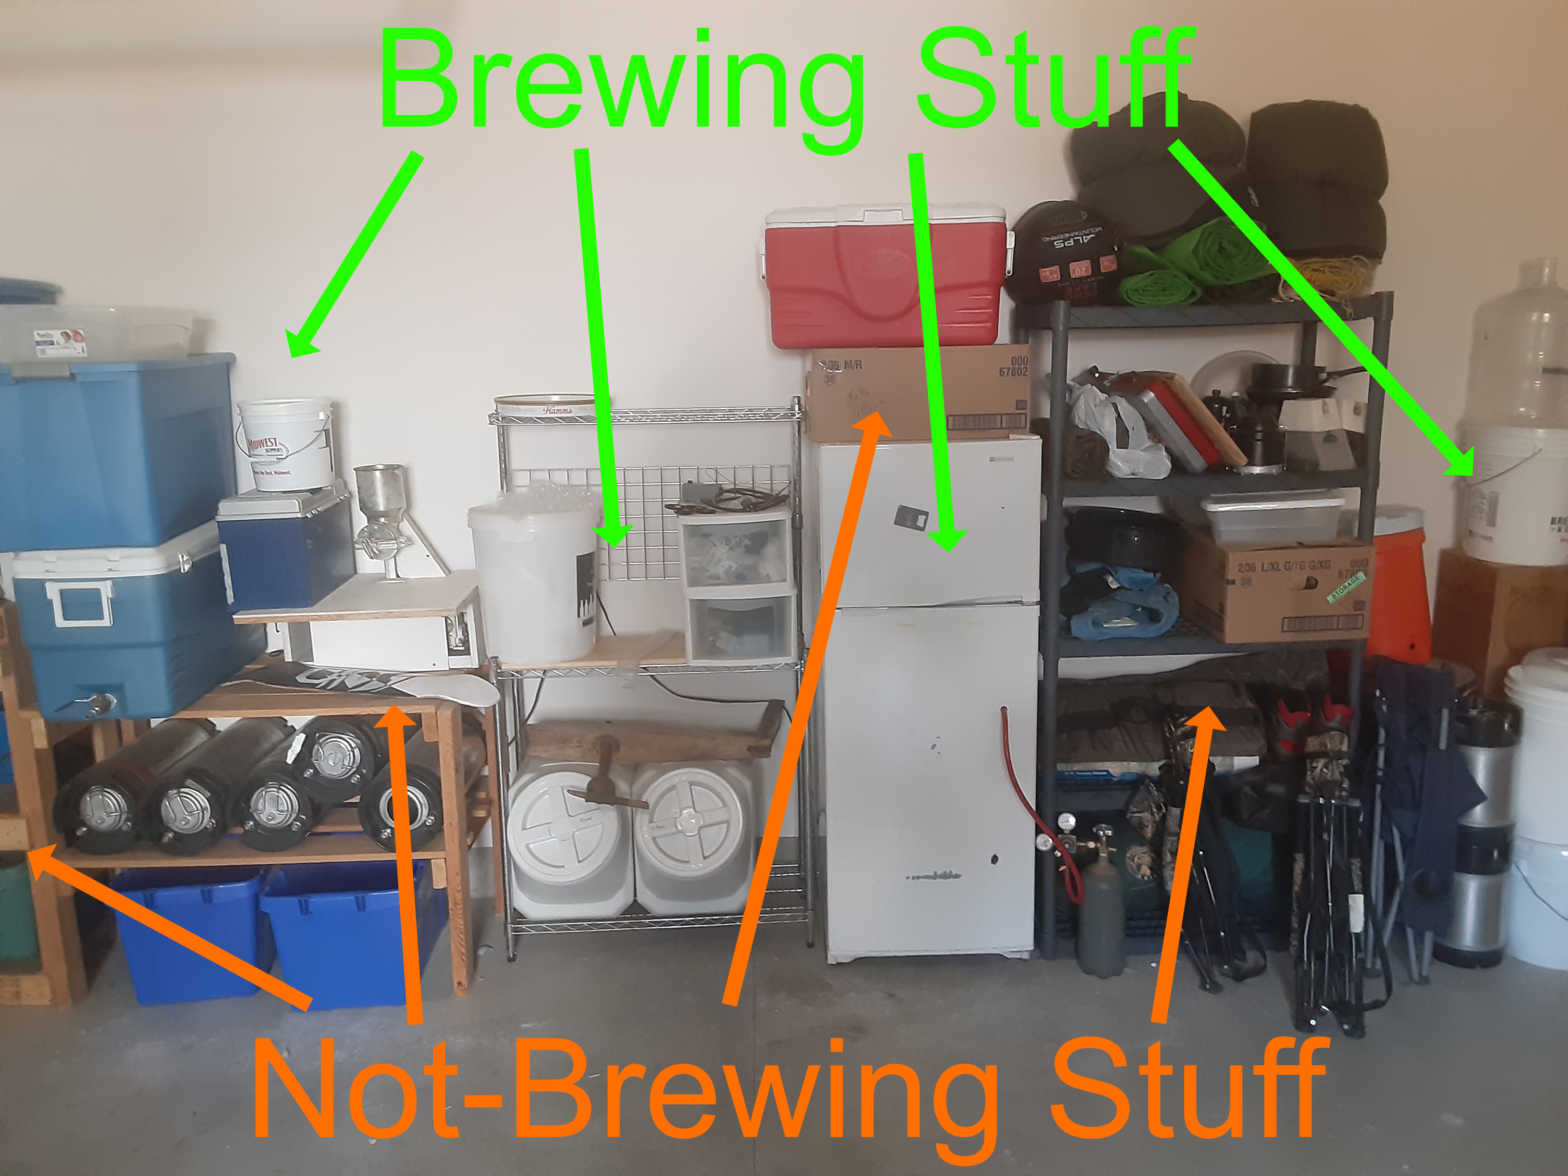
The above picture is one side of my garage. You can’t tell, but this side of the garage is where most of my brewing equipment and supplies are stored. Which is great . . . but it’s not consolidated as much as I would like. There’s also a lot of non-brewing gear mixed in: recycling bins, camping gear, a shelf we used to have gardening tools on, etc.

This picture is of the bench I’ll actually be using as my brew structure. It’s about the correct height, and is small enough I should be able move it around on my own, once I add wheels on one end . . . and move it closer to where I plan to brew . . . and get the chemicals, fuel, and woodworking supplies off of it.

Reassembling Gear

Mash Tuns

I had to disassemble both of my mash tuns for the move. They both had to be packed with items to maximize space usage, and the ball valves had to be removed. The manifold and false bottom used for sparging also had to be removed from both to prevent damage and maximize internal space.

Kettles

I have two kettles: one used for a hot liquor tank and a converted keg I use for my boil kettle. I had to remove the ball valves to prevent damage to the kettles and to items near the kettles in the moving van.

While packing, I also found the bazooka screen I had purchased but not installed in my kettle. That’s going to happen now.

Restocking Supplies

This will be an ongoing adventure. Some brew days involve tweaking the initial goal, forgoing a process, or changing the recipe based on what is available.

I know there are some things I need before I begin, however. I know I need sanitizer, I didn’t want my half-full bottle of Star-San to leak in the moving van so I gave it to a friend before our move.

I need tubing for transferring water from the HLT to the mash tun and draining wort from the mash into the kettle. Then I also need to either find my funnel or get some tubing for transferring from the kettle into my fermenter.

Making it Happen

Sometimes general clutter is a convenient excuse I use to use to prevent moving forward. We just picked up some shelving so I will be able to move items out of the way and organize all my brew gear on one side of the garage.

Watch for a post with an update of the new look! There will be some related videos about the reorganization, assemblies, and re-stocking efforts as well.

Brew up an adventure!

The Perfection of Simplicity

“Perfection is achieved, not when there is nothing more to add, but when there is nothing left to take away.” – Antoine de Saint-Exupery

Right now, there are so many craft beers full of different flavors. Super imperial pastry stouts, fruity milkshake IPAs, and barrel-aged spice craziness. I love some version of those beers, depending on the circumstances; but they can be too filling, too overwhelming, have too much alcohol, or too sweet for more than a small pour.

I enjoy the flavor of beer, and there are times when I want to be able to enjoy more than 8 ounces. This is where well-crafted, low alcohol, “simple” beers save the day. There’s a reason Pilsner became what is probably the most-consumed beer style in the world.

I’m talking about real Pilsner-style beers, not light American lagers. Pilsners made by craft breweries tend to be rich in malt flavor, just enough bitterness to contrast with the breadiness of the malt, some hop flavor to keep things interesting, and a simple fermentation character. This combination, when done well, hits all the right buttons. And they stay enjoyable, even if you have two or three.

Pilsner-style lagers are phenomenal, and some of my favorite breweries make really good Bohemian Pilsners, Czech Pilsners, or Munich Helles lagers. These beers are light-colored, well balanced, and delicious. But they’re lagers. While they’re delicious, lagers take longer to ferment than ales, and many commercial breweries are unwilling or unable to tie up a fermentation tank long enough to properly ferment a lager.

Enter ale styles that mimic many of the characteristics of light lagers: cream ale, golden ale, blonde ale, and pale ale. These beers have many similar characteristics to pale lagers, where they are relatively simple recipes, low in alcohol, and focus on balanced flavors and aromas so you have a beer that can be enjoyed in quantity without losing coherence or having a rough day-after.

I recently started working at Sawtooth Brewery in Hailey, ID. After a hot day in the brewery, their Mountain Time golden ale really hits the spot. The first time I tried it, before I started working with them, opened my mind to the immense enjoyment provided by simple beers. The flavors that result do not have to be simple, their complexity comes from how the ingredients balance against each other as a result of proportion, technique, and attention to detail.

Don’t overlook those simple beers just because they are lower in alcohol than the brewery’s IPA, strong ale, or other offering. A list of some of my favorite beers that illustrate the perfection of simplicity:

Lazy Monk Bohemian Pilsner

Sawtooth Brewery Mountain Time Golden Ale

Brewery Nonic’s Fair to Midland Mild Ale

Zymurgy Brewing’s Toast! Brown Ale

Hoptain America

Hop Shield

Hoptain America Pale Ale

Hoptain America is a simple but powerful reflection of elegant simplicity. Shield yourself from crazy and overly complex malt bills with a simple grist and straightforward hopping.

A powerful beer that celebrates simplicity and freedom.

Hoptain America: Zymurgy Wars is an opportunity for you to pick a side between Hoptain America pale ale and Hop Reactor red IPA.

Get a shirt with this design.

Mash Bill

  • 7 lb pale 2-row malt
  • 2 lb Briess Bonlander Munich malt
  • 1 lb crystal malt 40 L

Mash at 152 degrees Fahrenheit for 60 minutes and sparge to reach a boil volume of 6.5 gallons.

Hops

  • 0.5 oz CTZ 14.5% AA – 60 minutes
  • 0.5 oz Citra 13% AA – 20 minutes
  • 0.5 oz CTZ 14.5% AA – 20 minutes
  • 0.5 oz Citra 13% AA – 0 minutes
  • 0.5 oz CTZ 14.5% AA – 0 minutes

Yeast

Select a clean-fermenting American Ale yeast (obviously). Safale US-05, White Labs WLP-001, or Wyeast 1056 are great options.

Hop Reactor

Red Ale hydrometer
hop reactor - powered by lupulin

Hop Reactor Red IPA

Hop reactor is a red IPA powered by lupulin. Enjoy!

Nerd-dom comes in many forms. The first thing I nerded-out about was comic books. I spent so much money on my favorite books in high school I had a trunk full of books. When the Iron Man movies came out, I had an idea based on Iron Man’s arc reactor.

If you like the hop reactor symbol, I used it in a t-shirt design available for purchase.

Mash Bill

  • 12 lb 2-row pale malt
  • 2 lb Munich malt
  • 1 lb crystal malt 40 L
  • 0.5 lb crystal malt 120L
  • 0.25 lb chocolate malt

Mash at 152 degrees Fahrenheit for 60 minutes, sparge as required by your system to reach a boil volume of 6.5 gallons.

Extract

For extract brewing, replace pale malt with 8.25 lbs of light liquid malt extract. Steep the specialty grains for 30 minutes at 160 degrees Fahrenheit.

Hops

  • 1 oz Simcoe 13% AA – 60 minutes
  • 1 oz Centennial 10.5% AA – 10 minutes
  • 0.5 oz Citra 13% AA – 10 minutes
  • 1 oz Centennial 10.5% AA – 0 minutes
  • 0.5 oz Citra 13% AA – 0 minutes
  • 1 oz Centennial 10.5% AA – Dry Hop
  • 2 oz Citra 13% AA – Dry Hop

Dry hop after krausen has fallen back into the beer. Allow the hops to rest in the beer until fermentation is finished.

Yeast

Ferment with a clean ale yeast. I’ve used Safale US-05 with good results at 70 degrees Fahrenheit.

But my new favorite yeast is Omega Yeast Labs OYL-057 Hothead Ale Yeast. From the first batch I made with this yeast, the clean fruity character made me realize it’s a great complement to an aggressive hop schedule with American-style hops.